First startup
Safety Instructions (Must Read)
💡 - Hardware Usage Guidelines (Preventing Damage)
- Please use the included USB-A power cable (5A). Do not use power supplies below 3A current (such as phone chargers), as this may cause the smart single-board computer to be underpowered and crash frequently. If external high-power modules (e.g., motors) are needed, power them separately. Do not draw power from the smart single-board computer USB port or GPIO port (to avoid overloading and damaging the board).
- Always disconnect power before plugging or unplugging accessories (such as camera FPC cables or Ethernet cables). Hot-plugging may damage interface chips. The USB-C port is for firmware flashing and host mode communication only — do not use it to power the board.
- Operating temperature:-20 ~ +70 °C. Do not use the device in high-temperature (e.g., direct sunlight), high-humidity (humidity >80%), or dusty environments. Before handling, touch a metal object to discharge static electricity; avoid touching chip pins on the board with bare hands.
System and Software Precautions
Only official system images provided by Quectel are supported. Do not flash images intended for other boards (e.g., Raspberry Pi), as this will cause driver incompatibility and boot failures.
When installing software, use the apt command to download from official repositories. Avoid installing packages from unknown sources to prevent system compromise or crashes.
What You Need
Depending on the usage scenario, there are two configuration options: External Display and ADB Connection. √ = Required, ○ = Optional.
Accessories |
Specification |
External Display |
ADB Connection |
|---|---|---|---|
Quectel Pi M1/L1 smart single-board computer |
— |
√ |
√ |
Power Adapter |
5V/5A or 9V/3A PD |
√ |
√ |
Ethernet Cable |
Connect to router, or use Wi-Fi |
○ |
○ |
Display |
PC / Laptop / MIPI screen |
√ |
○ |
USB-C DP / HDMI Cable |
Connect to Display |
○ |
○ |
Keyboard/Mouse |
USB wired/wireless |
√ |
√ |
PC / Laptop |
For running terminal software |
○ |
√ |
USB Type-C to USB Type-A Data Cable |
Connect board to PC |
○ |
√ |
Pre-Power-On Preparation
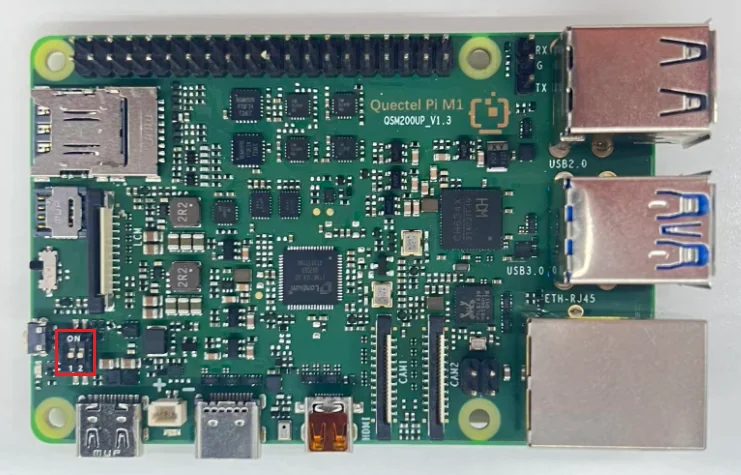
Quectel Pi M1/L1 smart single-board computer has 2 DIP switches. Set both DIP switch 1 and DIP switch 2 to the OFF position, as shown below.
Note: tips |
|---|
This demonstration uses the Quectel Pi M1 smart single-board computer. The Quectel Pi L1 smart single-board computer operations are the same as for the M1. |
DIP Switch States:
|
|
|
|---|---|---|
DIP Switch 1 |
USB host mode — supports Type-A ports, Ethernet, and ADB; mouse and keyboard can be connected |
USB device mode — for ADB debugging only; Type-A ports and Ethernet are not available |
DIP Switch 2 |
System boots into USB download mode |
Normal system boot |
Choose Your Setup Scenario
Quectel Pi M1/L1 smart single-board computer ships with Debian 13 pre-installed — no image flashing is required. Choose the appropriate startup method based on your equipment:
Scenario |
Applicable Conditions |
Reference |
|---|---|---|
With External Display |
Has HDMI/USB-C DP/MIPI display, keyboard and mouse |
|
Without External Display |
No display device; only a USB-C data cable and a computer |
Scenario 1: External Display Boot the Board
Hardware Connection
⚠️ Warning: Disconnect all power sources before making connections. Hot-plugging interfaces may cause hardware damage!
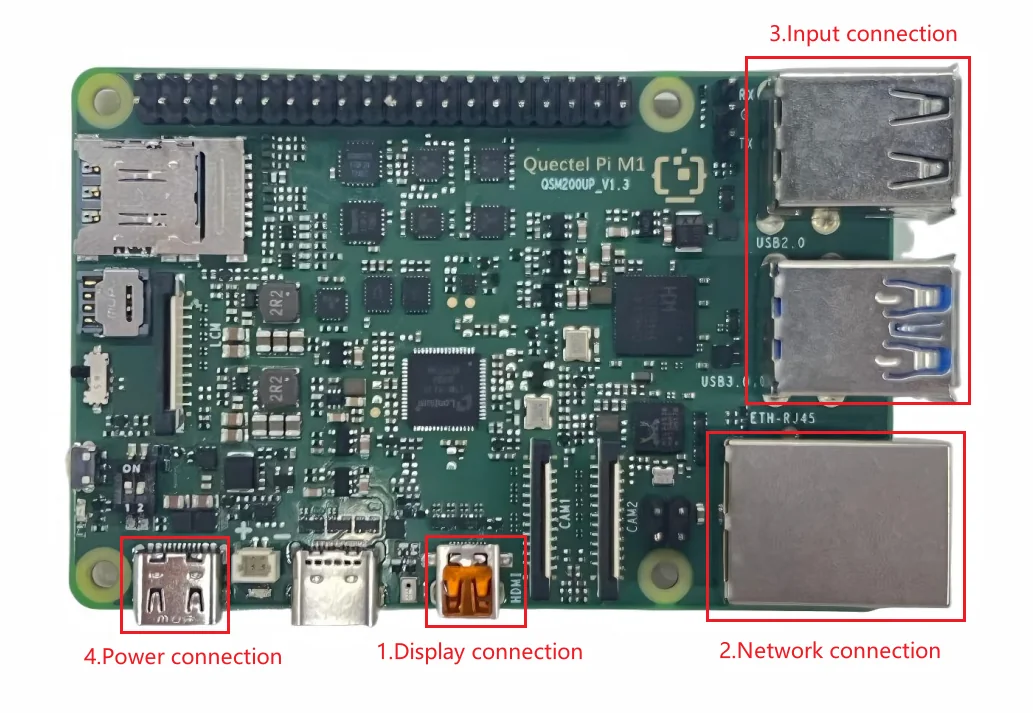
Display Connection: Select the connection method based on the display’s interface. Here we use Method 2: connect one end of the Micro HDMI cable to the board’s Micro HDMI port and the other end to the display’s HDMI port.
Method 1 (HD): Connect one end of the FPC cable to the Quectel Pi M1/L1’s MIPIport, and the other end to the display’s MIPI port. For details, refer to the MIPI。
Method 2 (Compatible): Connect one end of the HDMI cable to the Quectel Pi M1/L1’s HDMI port, and the other end to the display’s HDMI port.
Network Connection: Connect with an Ethernet Cable to Quectel Pi M1/L1 Ethernet port to a router’s LAN port using an Ethernet cable.
Peripheral Connection: Connect the USB Plug the USB keyboard and mouse into the two Quectel Pi M1/L1 two USB-A ports on the Quectel Pi M1/L1. For wireless keyboard/mouse, insert the receiver into a USB port using an Ethernet cable.
Power Connection: Finally, connect the USB-A power cable’s USB-A end to the power adapter, and the USB-C end to Quectel Pi M1/L1 end to the smart single-board computer’s power port.
System Boot
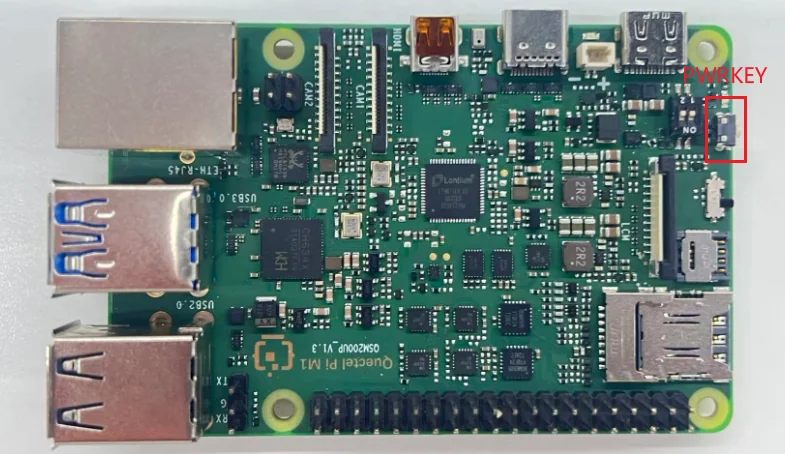
⚠️ After connecting power, press and hold the Quectel Pi M1/L1 on the right side of the PWRKEY button on the right side of the Quectel Pi M1/L1 for 3–5 seconds until the system starts.
:width: 785px :height: 454px :align: center
- Turn on the display and confirm the input source is set to the correct port (e.g.,USB-C or HDMI).

- Quectel Pi M1 smart single-board computer Boot Indicators **:** After connecting **Quectel Pi M1** power (plug in the power cable), the **Quectel Pi M1** power LED (typically blue) stays on, and the system LED (typically blue) turns on then off, indicating the system is booting.

- Quectel Pi L1 smart single-board computer Boot Indicators: After connecting power to **Quectel Pi L1** power (plug in the power cable), the **Quectel Pi L1** power LED (typically blue) stays on, and the system LED (typically blue) turns on then blinks, indicating the system is booting.

- Wait approximately **1** minute(s), and the display will show the system desktop.

### **Quectel Pi M1 smart single-board computer System Login**

For login username and password settings, refer to the [System Login](<../../Operating System/Debian(Gnome)/System Login/System Login.md>) section.

```{note}
The ***root*** account has no password by default. Please set the password before use.
If you open the **Enterprise Login** interface while creating a user and cannot exit, click **Enterprise Login** again to return to the user-creation screen.
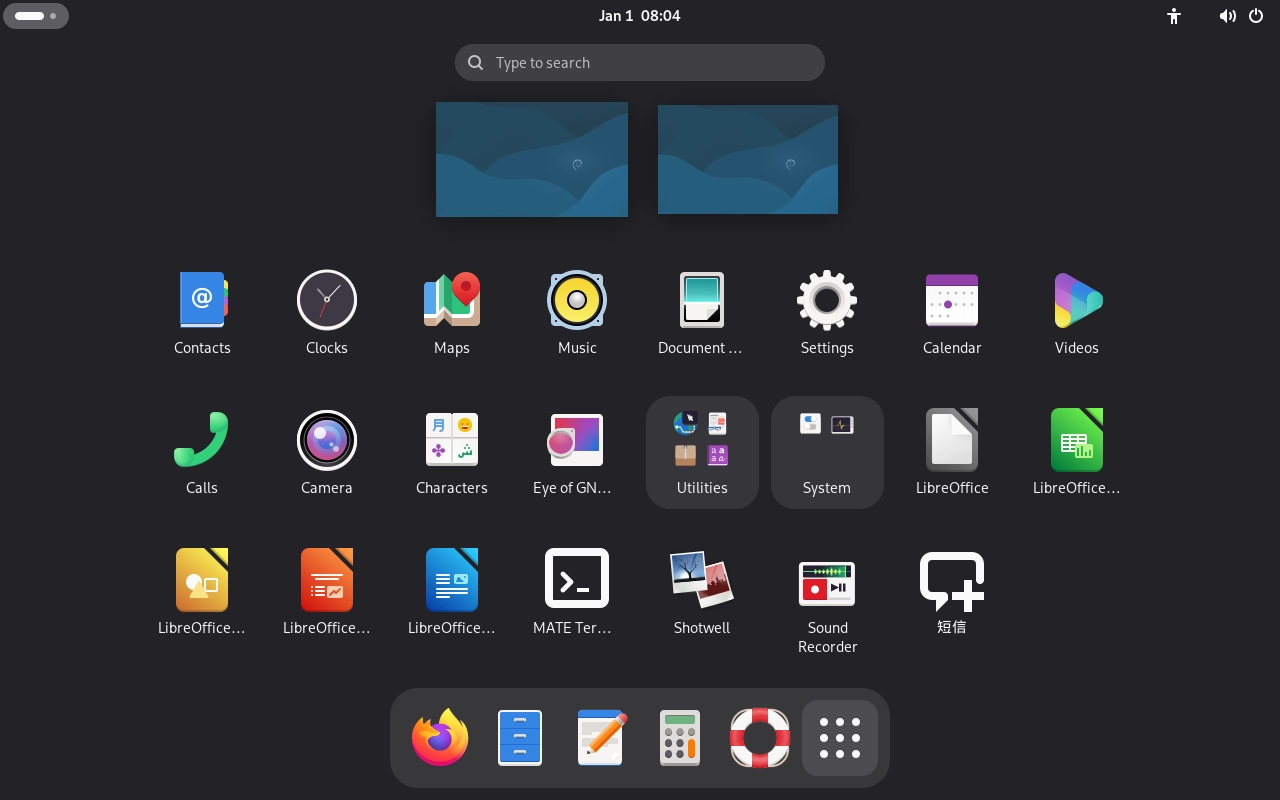
M1’s Debian system uses the GNOME desktop by default. You can switch to the Weston desktop with the following command:
qpi-config switch weston
Language Settings
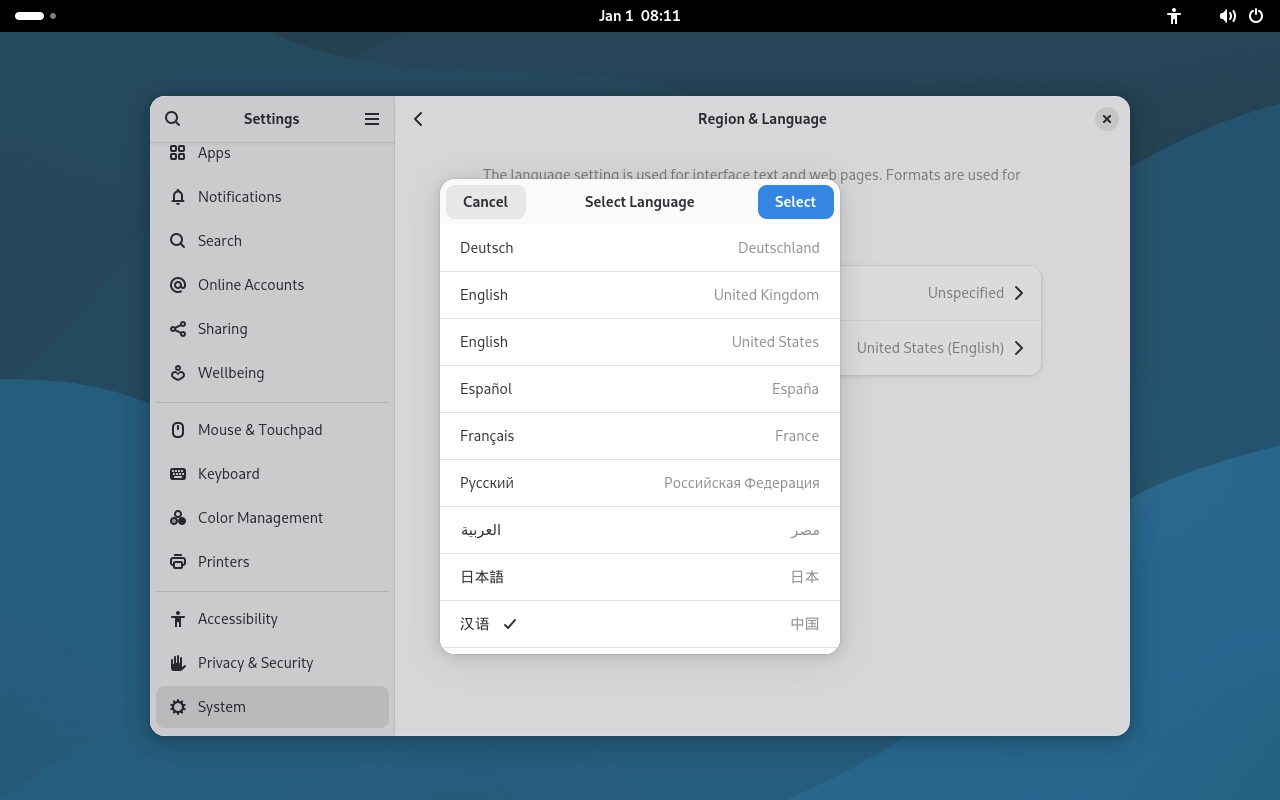
Navigate to System > Region & Language > Language > Select Language. Log out and back in for changes to take effect.
Note
If you switch the system language to Chinese, keep the old username after re-login; otherwise, you may be unable to access paths like Desktop and other paths.
Network Settings
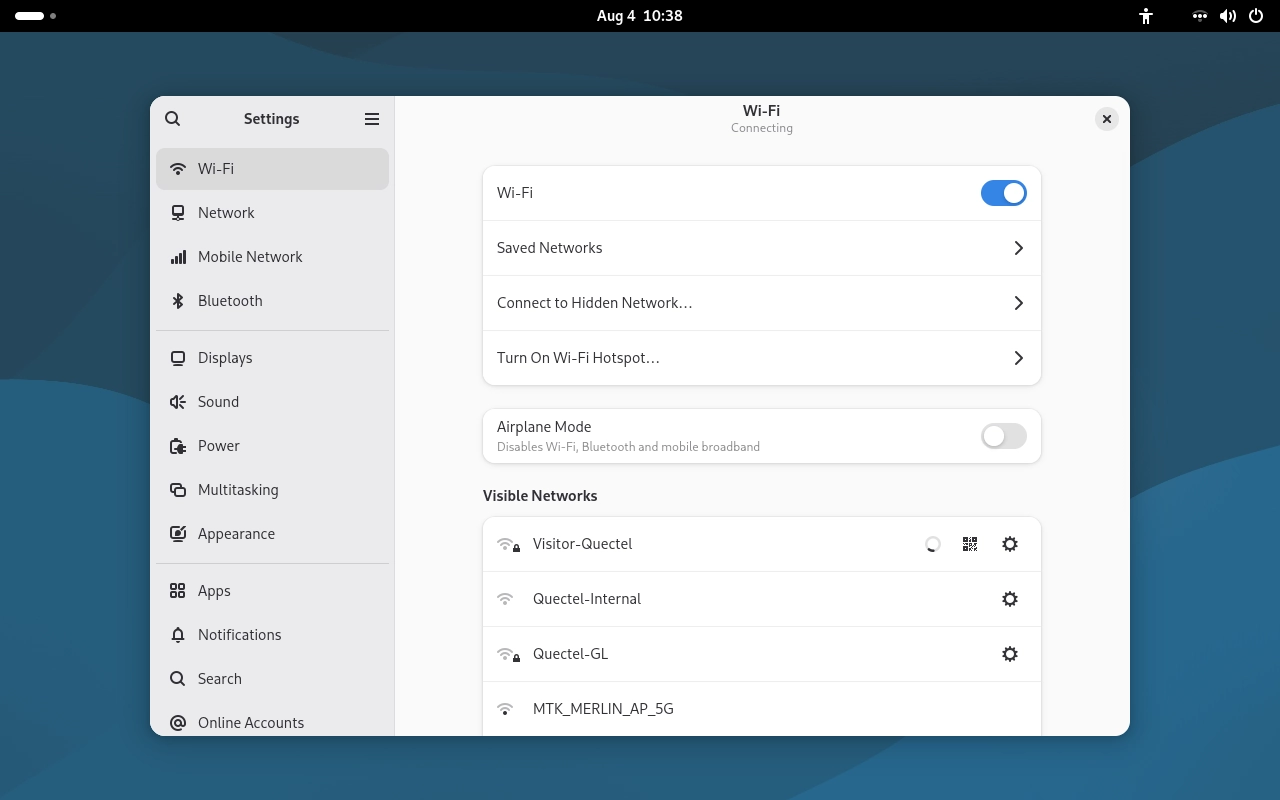
In Settings, connect to Wi-Fi by selecting your network name and entering the password.
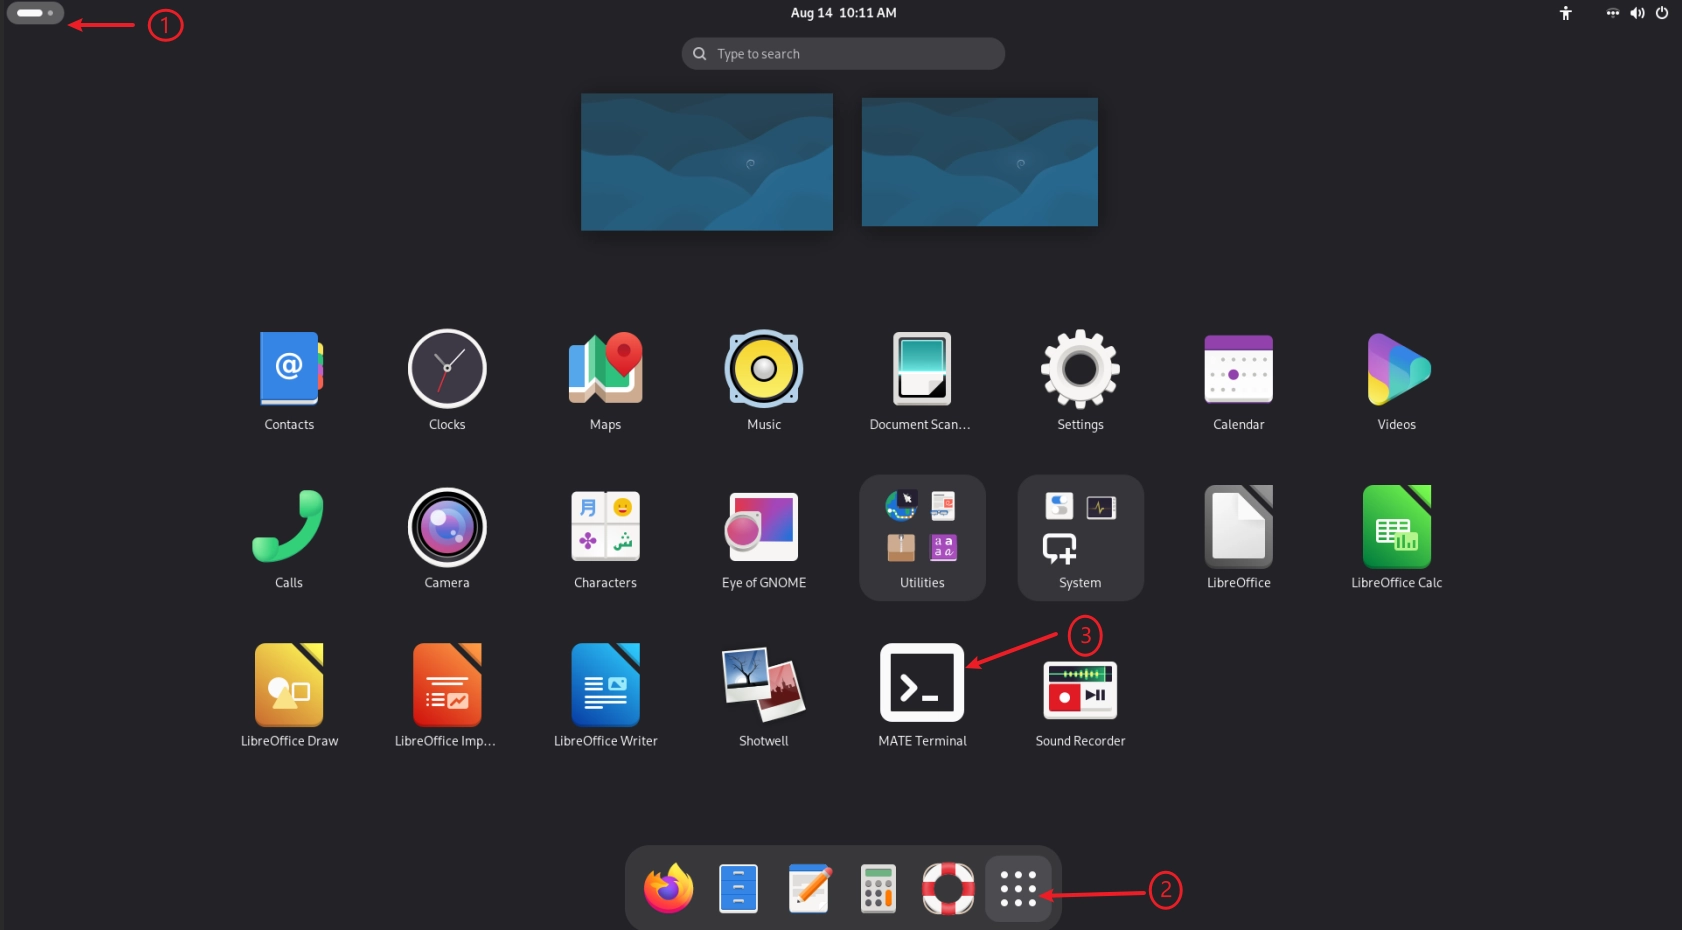
Opening the Terminal
Quectel Pi L1 smart single-board computer System Login
L1’s Debian system currently only supports the Weston desktop.
Note
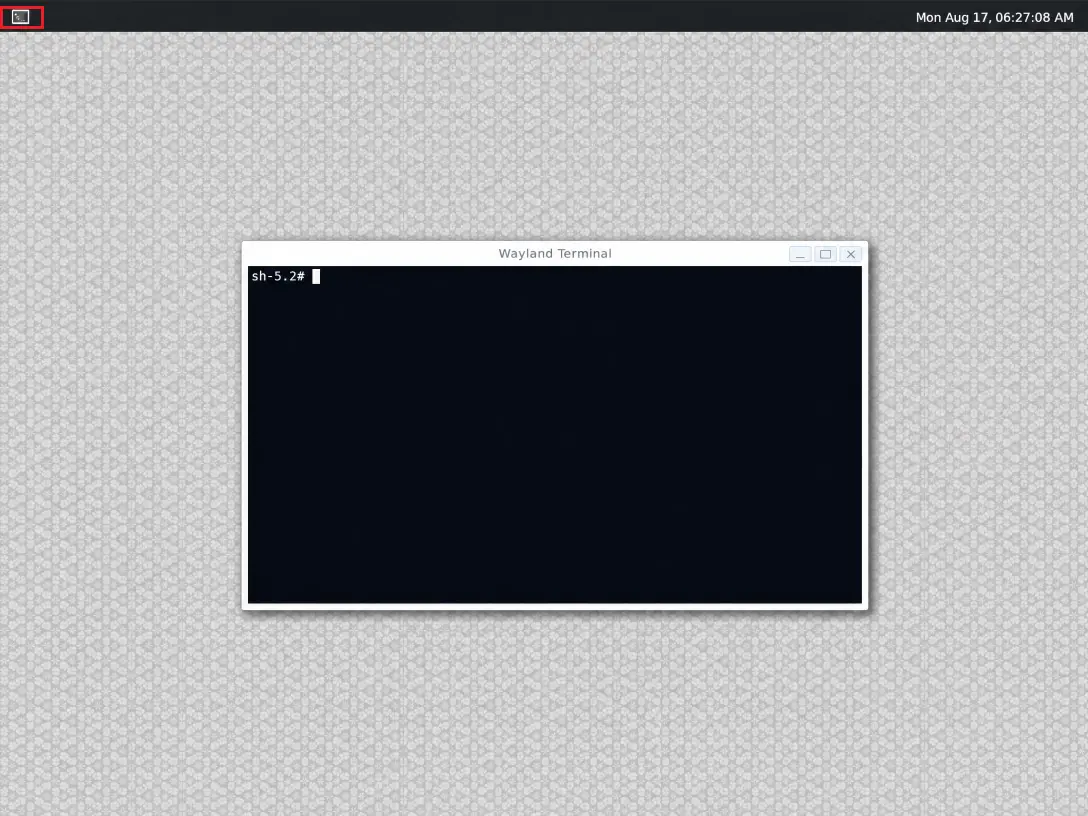
Click the icon in the upper-left corner to open the terminal.
Scenario 2: Without Display Boot the Board
If you have not connected a display, keyboard, and mouse to the Quectel Pi M1/L1 smart single-board computer, you can control it remotely from another computer.
To remotely access the Quectel Pi M1/L1, connect it to the network first, then access it from a client on another device. Use SSH for remote command-line terminal access, or RDP for remote graphical desktop access. If the device is not yet connected to the network, use ADB for initial network configuration.
For more remote access options, refer to Device Connection。
Method |
Description |
Prerequisites |
Tutorial |
|---|---|---|---|
RDP |
Remote access to graphical desktop |
Device connected to network |
|
SSH |
Remote access to command-line terminal |
Device connected to network |
Note
On first boot, it is recommended to configure Wi-Fi via ADB first, then use RDP or SSH for daily operations.
ADB Setup
Hardware Connection
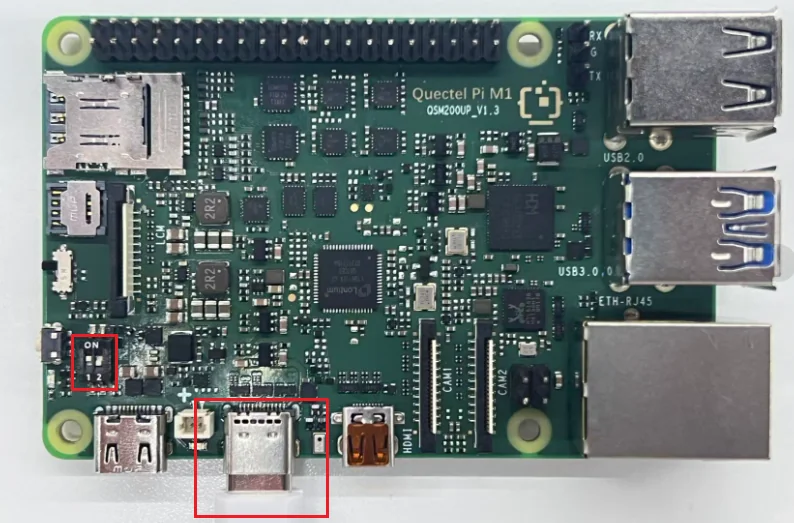
Prepare aUSB to Type-C to Type-C end to Quectel Pi M1/L1’s USB-C port on the Quectel Pi M1/L1, and the other end to your host computer.
Note
DIP switch 1 must be set to ON, otherwise ADB will not work.
ADB Installation
Download the ADB tool:platform-tools 。
Extract the downloaded platform-tools to a folder on your computer.
Verify ADB Device Recognition
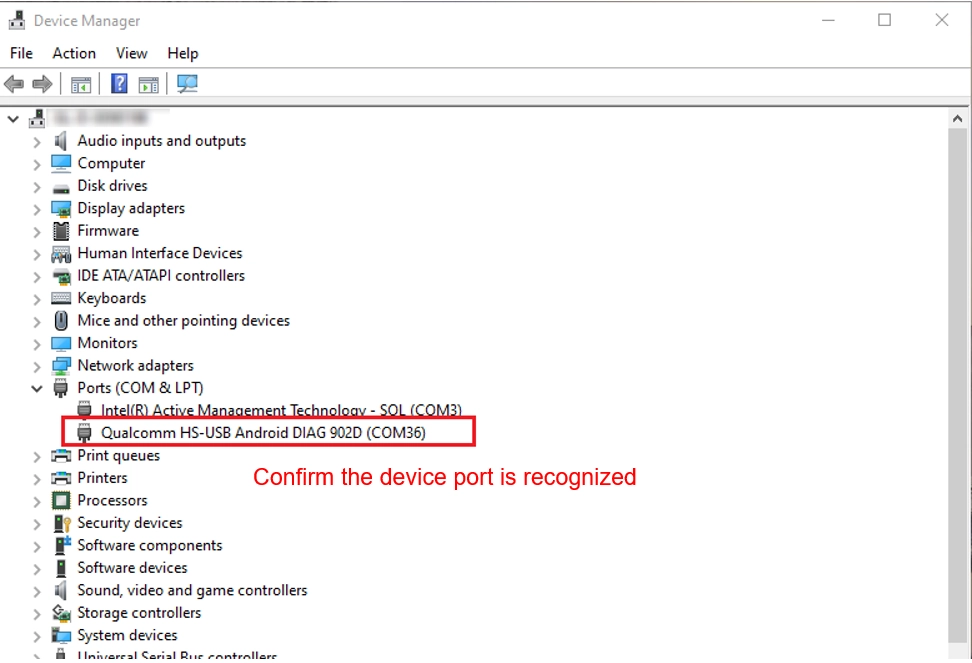
Open platform-tools folder, type cmd in the address bar, and press Enter to open the adb terminal. Run the following command:
adb devices
Example output:
List of devices attached
790c2fb9        device
Create a Regular User
The default system only has the root user. It is recommended to create a regular user for daily operations.
Create User
The following example creates a user named pi. You may change the username as needed.
# 'pi' is the username being created
adduser pi
The system will interactively prompt you to set a password. Enter the password twice as prompted.
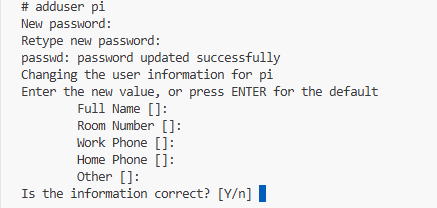
After user creation, the system automatically generates /home/username as the user’s home directory, where personal files and project code can be stored.
Grant sudo Privileges
usermod -aG sudo pi
Switch User
# Verify user
id pi

#Switch User
su - pi

# Test privileges
whoami
sudo whoami
# Should output 'root', confirming sudo privileges
Connect to Wi-Fi
The board includes the built-in qpi-config tool for quick Wi-Fi management.
Scan for Nearby Wi-Fi Networks
qpi-config wifi scan

Connect to Wi-Fi
# Connect to Wi-Fi
qpi-config wifi connect "Your WiFi Name" "Your WiFi Password"

# View saved Wi-Fi connections
qpi-config wifi show

# Remove a saved Wi-Fi connection
qpi-config wifi remove <connection uuid>
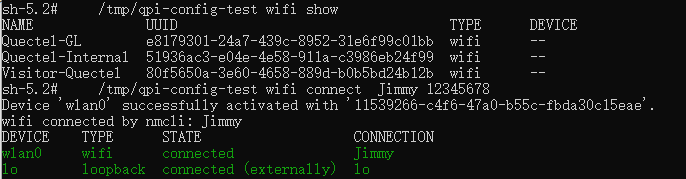
Verify Network Connectivity
ping www.google.com
Purpose
Android Debug Bridge(ADB) is a Android SDK command-line tool provided by the Android SDK that establishes communication between a computer and an Android device (physical device or emulator), enabling device debugging, management, and development testing.
Serial Console
Hardware Connection
⚠️When using a USB serial cable with the smart single-board computer for serial login, ensure the pin connections are correct. Incorrect pin connections may damage the hardware.
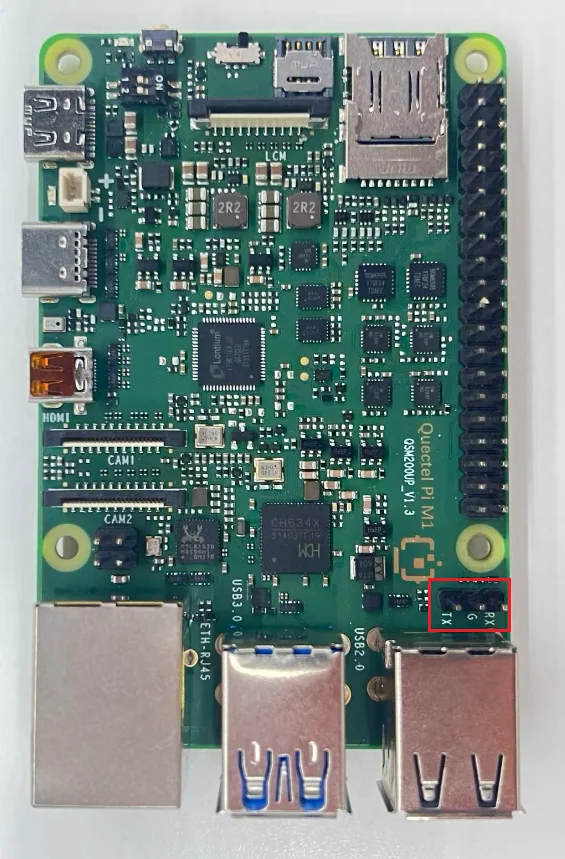
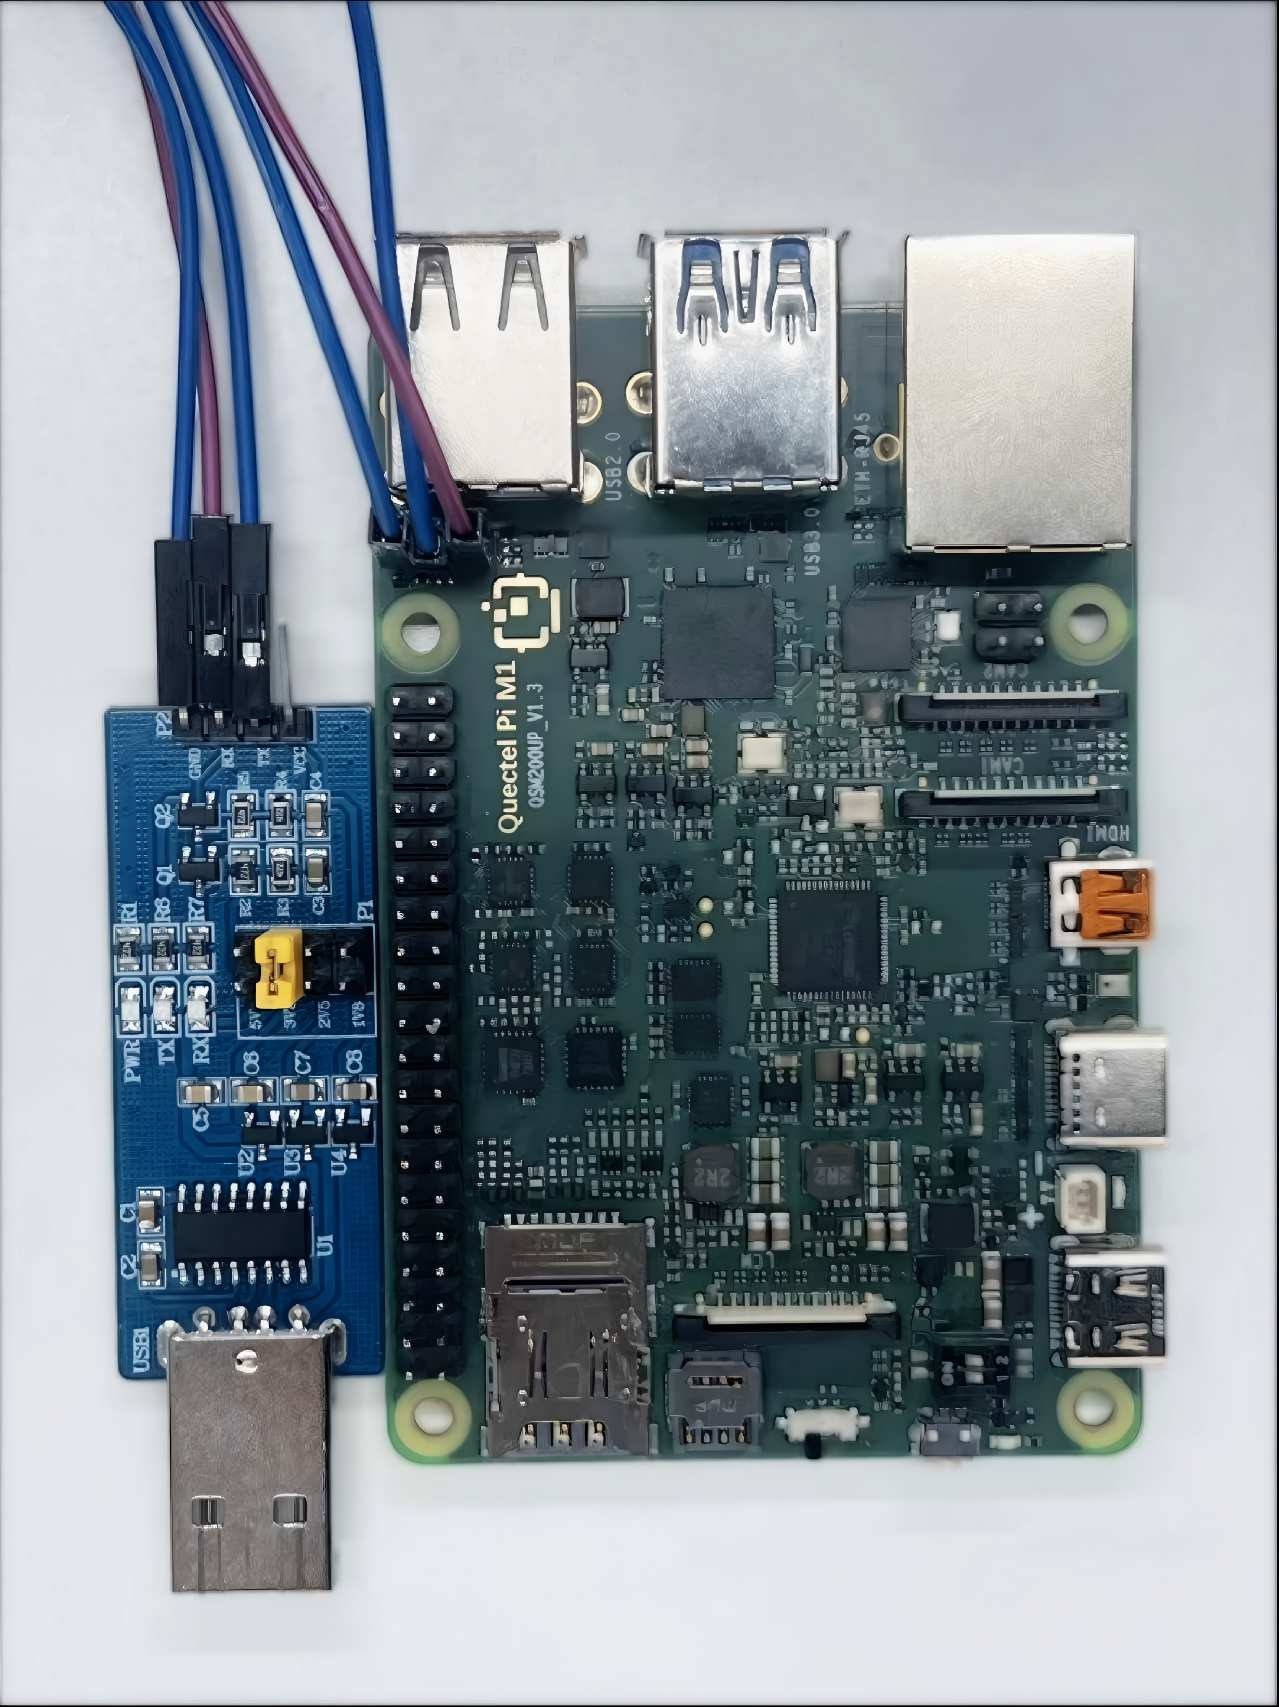
Connection Method
Quectel Pi M1/L1 smart single-board computer’s GND pin connects to the USB serial cable’s GND pin
Quectel Pi M1/L1 smart single-board computer’s TXD pin connects to the USB serial cable’s RXD pin
Quectel Pi M1/L1 smart single-board computer’s RXD pin connects to the USB serial cable’s TXD pin
Serial Login
Note
The CH340 driver must be installed first; otherwise the serial port will not be recognized.
It is recommended to download the QPiTerminal tool for serial connection.
Open Device Manager to check the serial port.
Double-click to open QPiTerminal, select USB serial port and set the baud rate to 115200, then click connect。
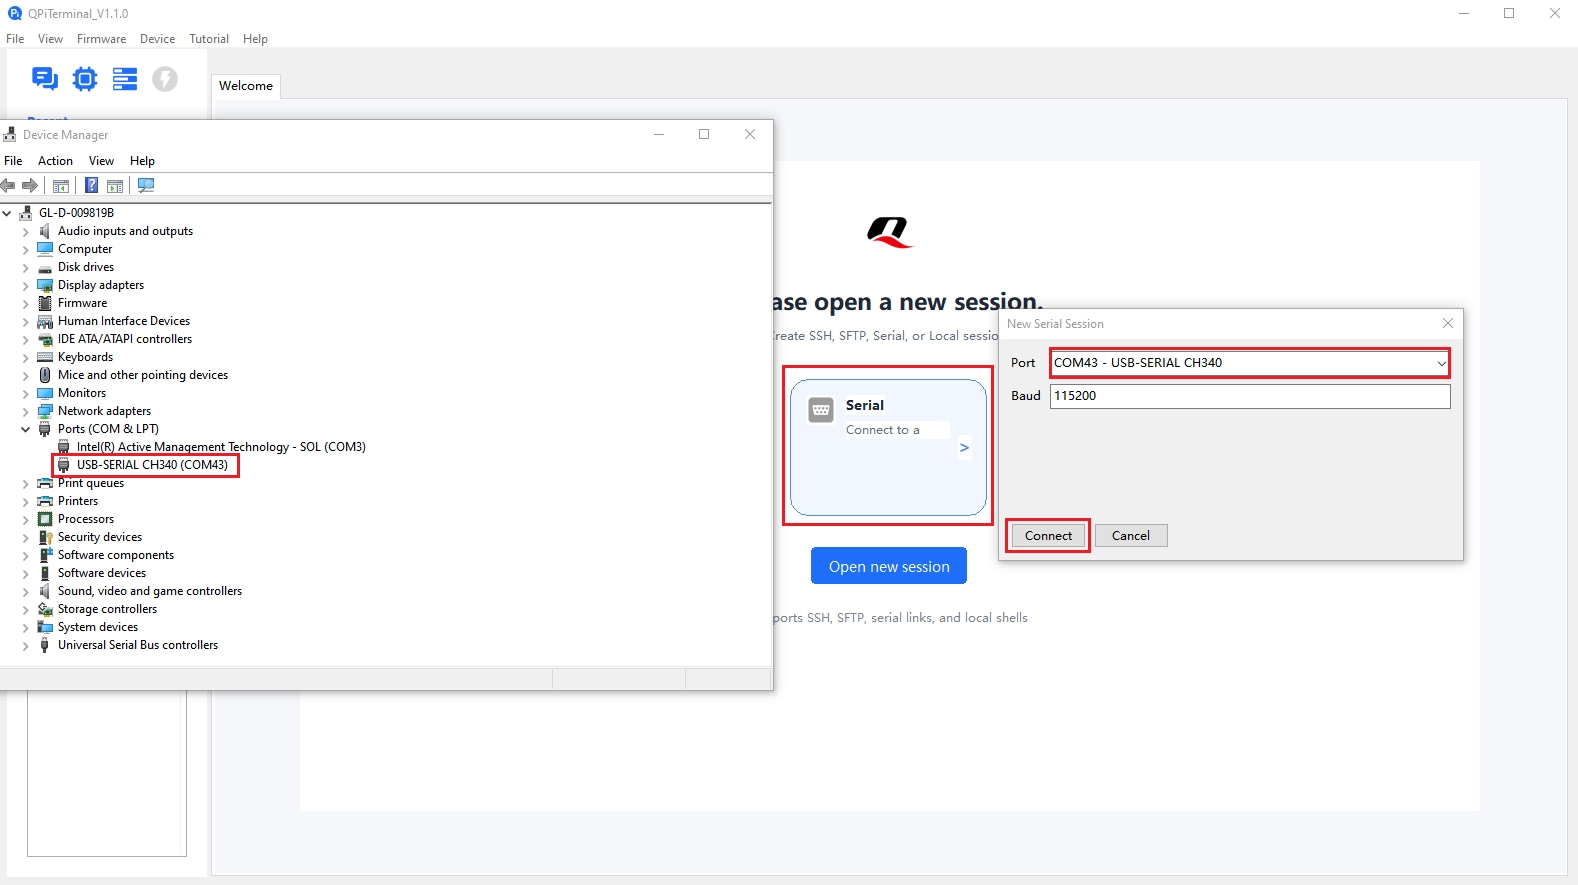
Enter the system username and password in the terminal to log in (the password will not be displayed during input; press Enter after entering the password to log in). Enter
lsto test. Successful input confirms the serial connection is working; you can then view logs and run commands via the serial port for debugging.
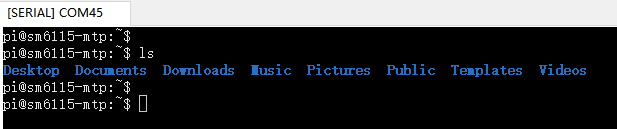
Purpose
Serial Console is primarily used to view system logs and run debugging commands via serial connection, and serves as a backup method when the graphical interface is unavailable. It is an essential tool for embedded system development and maintenance, especially for low-level debugging and troubleshooting.
SSH Connection to the smart single-board computer
Check Device IP Address
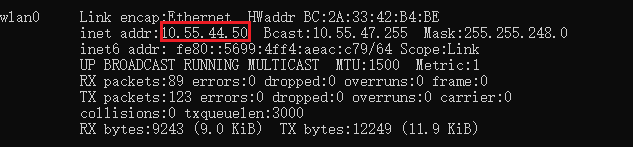
In the smart single-board computer terminal, execute the sudo ifconfig command to obtain the device’s IP address.
In this example, the device IP is 10.55.44.50。
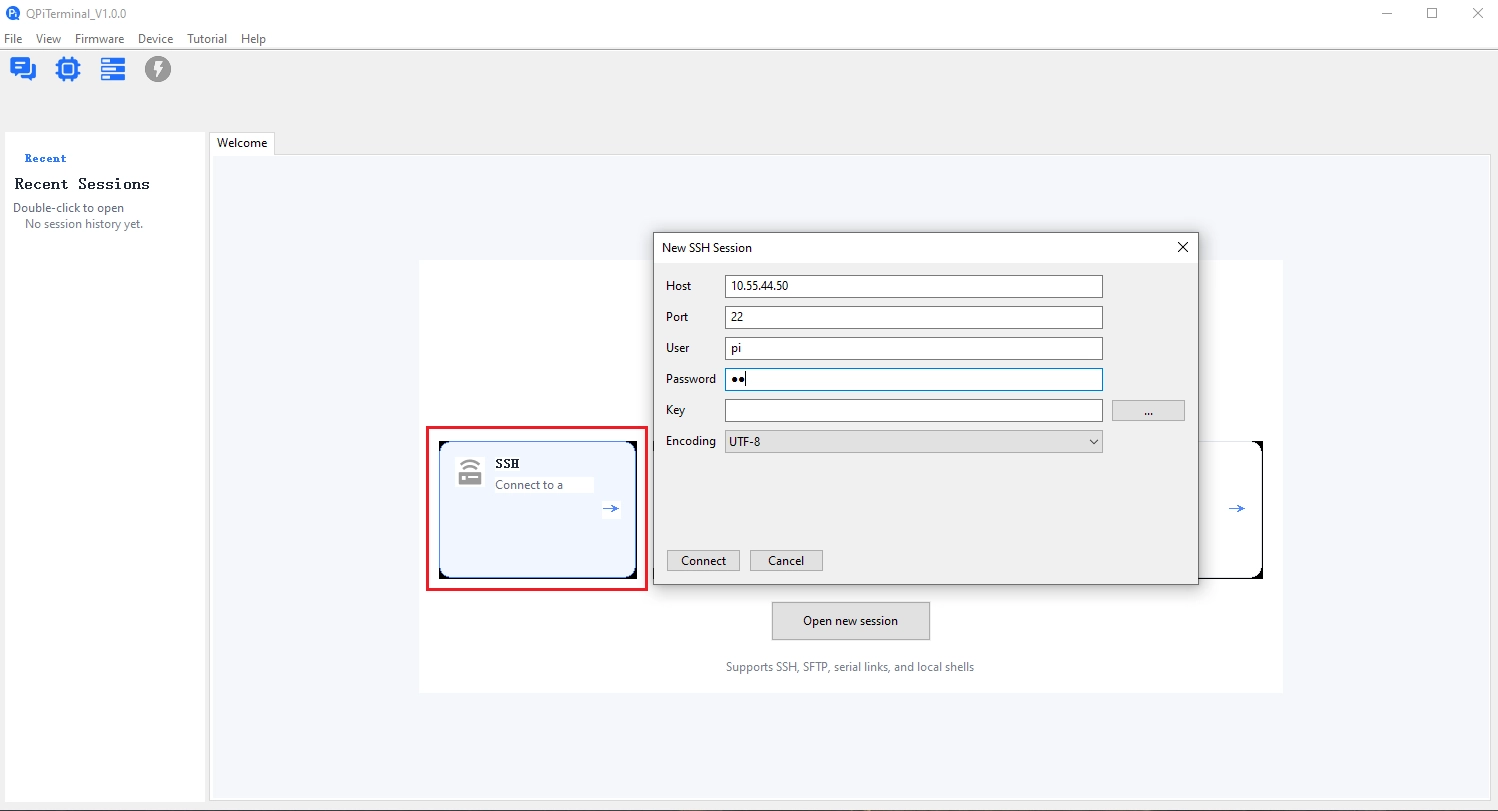
Using the QPiTerminal Tool for SSH Connection to the smart single-board computer
Open a new SSH session, enter the smart single-board computer’s IP address, username, and password, then click Connect (Connect)。
System Health Check
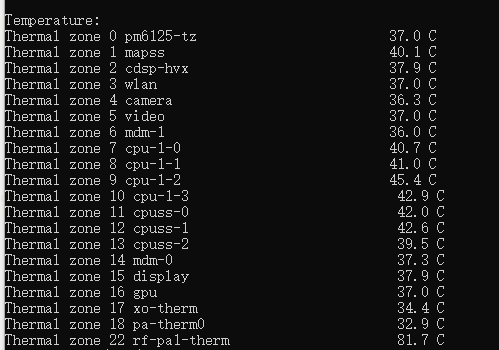
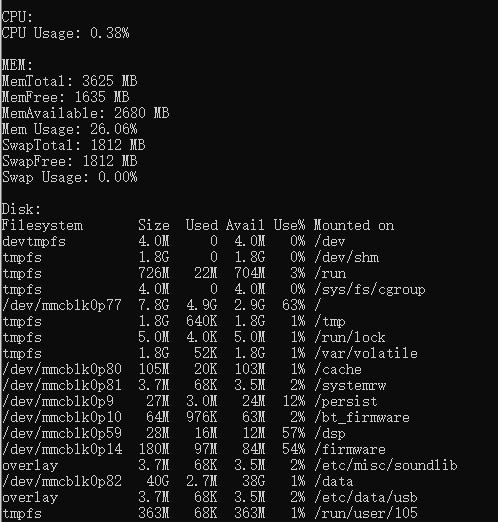
After the system boots, use the qpi-config command in the terminal to quickly check system status:
Query Module Temperatures
sudo qpi-config dump temperature
Query CPU, Memory, and Storage Status
sudo qpi-config dump systemusage
Network Status Check
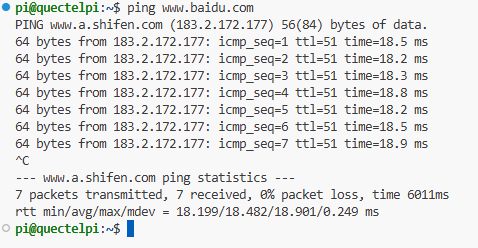
After connecting the device to the network via Ethernet or Wi-Fi, use the ping command to confirm the device can access external networks
ping www.baidu.com
Normal ConnectivityExample output:
PING www.a.shifen.com (183.2.172.177) 56(84) bytes of data.
64 bytes from 183.2.172.177: icmp_seq=1 ttl=51 time=18.5 ms
64 bytes from 183.2.172.177: icmp_seq=2 ttl=51 time=18.2 ms
64 bytes from 183.2.172.177: icmp_seq=3 ttl=51 time=18.3 ms
64 bytes from 183.2.172.177: icmp_seq=4 ttl=51 time=18.8 ms
64 bytes from 183.2.172.177: icmp_seq=5 ttl=51 time=18.2 ms
64 bytes from 183.2.172.177: icmp_seq=6 ttl=51 time=18.5 ms
64 bytes from 183.2.172.177: icmp_seq=7 ttl=51 time=18.9 ms

--- www.a.shifen.com ping statistics ---
7 packets transmitted, 7 received, 0% packet loss, time 6011ms
rtt min/avg/max/mdev = 18.199/18.482/18.901/0.249 ms
Indicator Descriptions:
64 bytes from ...— ICMP reply received, indicating normal network connectivity
icmp_seq— Sequence number; responses are continuously received in increasing order
ttl— Time to live; normal values range from 30 to 128
time— Round-trip latency; lower values indicate better network quality
0% packet loss— Packet loss rate is 0%, indicating stable network
Your First Hello World
Setting Up the Development Environment
After logging into the Quectel Pi M1/L1 smart single-board computer system, open a terminal window, enter the following command, and press Enter to install the necessary development tools:
sudo apt update && sudo apt install gcc make
Compiling and Running Hello World (C Version)
Open the system terminal and enter the command to create a hello.c file.
touch hello.c
Enter the following command to use the vim editor to open the hello.c file,
sudo vim hello.c
Copy the following code into the hello.c file, press “ESC + Shift + :”, then type “wq “ to save the code and exit the vim editor.
#include <stdio.h>
int main(void)
{
    printf("hello world\r\n");
    return 0;
}
Execute the following command to compile the code:
gcc hello.c -o hello
Execute the following command to run the hello program:
./hello
Program output:
./hello
hello world
Compiling and Running Hello World (Python Version)
In addition to C, you can also use Python to quickly implement a Hello World program. The system comes with Python pre-installed, so no additional interpreter installation is required.
Open the system terminal and enter the command to create a hello.py file.
touch hello.py
Enter the following command to use the vim editor to open the hello.py file.(M1You can also use the Files file manager to edit code in the desktop environment.)
sudo vim hello.py
Copy the following code into the hello.py file, press “ESC + Shift + :”, then type “wq “ to save the code and exit the vim editor
def main():
    print("Hello, World!")

if __name__ == "__main__":
    main()
Python is an interpreted language — no compilation needed, just execute directly:
python3 hello.py
Program output:
python3 hello.py
Hello, World!
Purpose
Hello World Program is primarily used to verify that the development environment is set up correctly. By writing, compiling, and running a simple C/Python program, it tests basic system functions including the compiler and runtime environment, making it a fundamental practice for getting started with embedded development.
Safe Shutdown and Reboot
Quectel Pi M1 provides shutdown and reboot options via the desktop and command line.
Shutdown via Desktop GUI
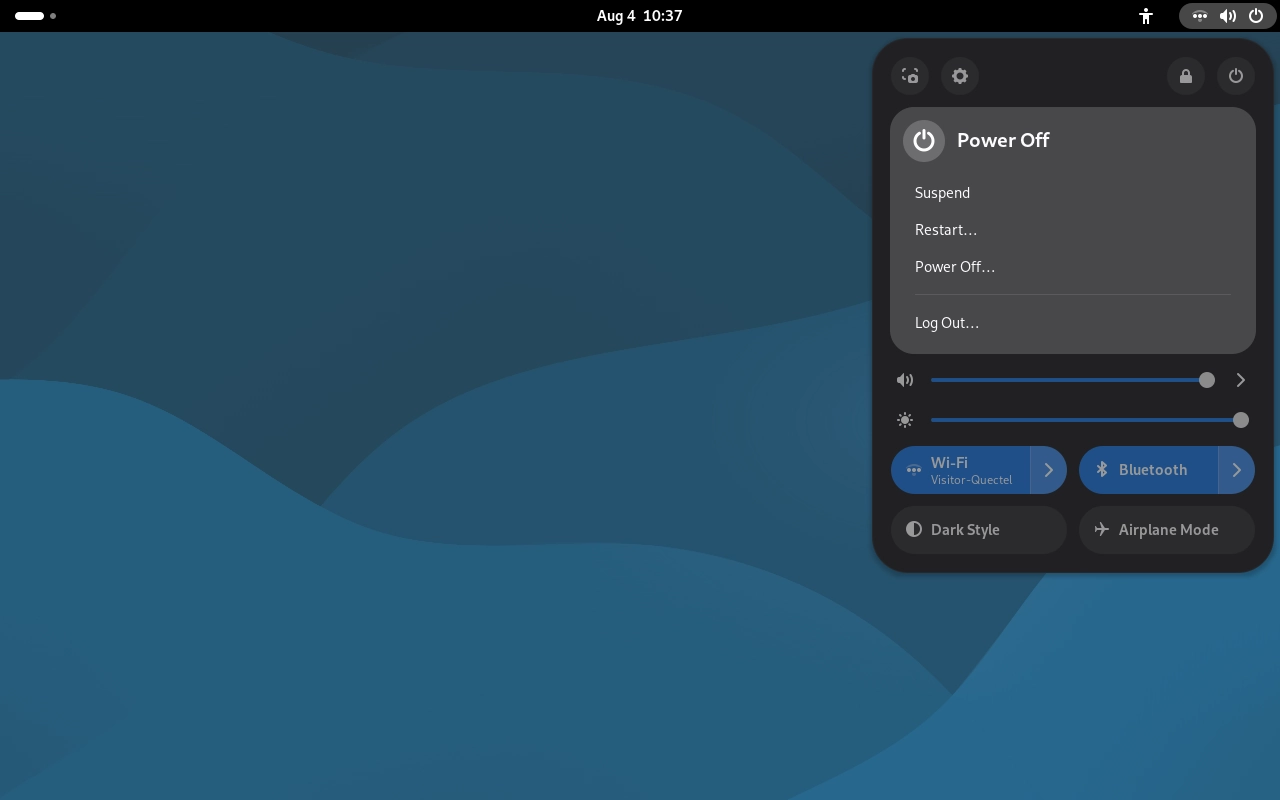
If you are using an external display in a desktop environment:
Click the upper-right corner of the desktop.
select Power Off or Restart。
Shutdown via Command Line
Quectel Pi M1/L1 can be shut down or rebooted from the terminal (local terminal, SSH, or ADB shell) using the following commands:
Shutdown
sudo poweroff
Reboot
sudo reboot
What’s Next?
After completing the getting-started experience, explore more features: